Pages

Tuesday, April 27, 2010

Shak Shuka


I don’t really eat much breakfast, I usually have some fruit and then I’m out the door and on my way to work. But I love going out for a big breakfast on the weekends and catching up with friends. Last weekend I had breakfast at Riki Blakes Café (4 Blake Street, North Perth), this place was recommended to me by a friend who said that they make some great North African and Middle Eastern dishes for breakfast. When I saw the menu, I was drawn to the Shak Shuka dish, it sounded delicious and it was something different from the usual breakfast of bacon, eggs, mushrooms and toast etc.

Shak Shuka is a spicy tomato mixture served in the pan that it is cooked in with poached eggs on top, it is eaten with pieces of bread dipped in it. It was very flavoursome, the tomato mixture was rich and aromatic with different spices. All my friends who ordered Shak Shuka agreed that it was delicious.

When I have a dish that I enjoy eating, the next thing I want to do is learn how to cook it myself. 

Shak Shuka is a North African dish and was brought to Israel by Tunisian Jews after the Jewish exodus from Arab lands. It’s a popular Israeli vegetarian dish that is eaten for breakfast. The name Shak Shuka is a combination of North African and Hebrew words, and means “all mixed up.”  I looked up some recipes on the internet and it’s a very simple dish to make. It’s also very versatile in that it can be vegetarian or you can add in some sausages, and there are many different versions of the spicy tomato mixture where you can add other vegetables and vary the combination of spices used. So you can basically put in anything you want and then ‘mix it all up’.


Over the Anzac day long weekend, I cooked up some Shak Shuka! 

This is my version of Shak Shuka, an amalgamation of numerous internet recipes and my continual tasting as I cooked to try to get the flavours as close to the one that I had at Blakes Café…as I could remember…

Ingredients
Olive oil
2 eggs
bread (any bread will do – white, pita, Turkish, a baguette)
crumbled goats cheese (or feta)
parsley for garnish
Tomato mixture
1.2 kg Roma tomatoes
1 red capsicum
1 red paprika
2 shallots
3 cloves of garlic
1-1 ½ cup stock (I used chicken stock)
1 teaspoon sugar
salt and pepper to taste
Spices
2 teaspoons sweet paprika powder
½ teaspoon cumin powder
½ hot paprika powder
¼ cayenne powder
½ turmeric powder
½ coriander powder
¼ teaspoon caraway powder


Optional 
For more heat – add in a jalapeno into the tomato mixture or some harrisa paste.
The tomato mixture can also have other vegetables like corn, peas, mushrooms or eggplant.
You can also add in a little tomato paste (I had this written down but forgot to add some in).


Method
 

Preheat the oven to 200C and roast the capsicum and paprika for 15-20minutes. Then peel off the skin and finely dice.

Blanch the tomatoes, peel the skin off and dice them (removing the seeds and jelly).

Finely dice the shallots and garlic.

Heat up a small pan and then add in some olive oil. Saute the shallot and garlic together until fragrant and shallots become translucent.

Add in the tomatoes, capsicum and paprika and fry together for 5 minutes.

Add in a pinch of salt and pepper.

Then add in the spices (use the quantities listed above as a guide, feel free to alter the mix of spices to your desired taste)

Add in 1 cup of stock, reduce the heat to low and simmer uncovered for 20-30 minutes until the mixture is thick and little liquid is left, stirring occasionally to make sure that the vegetables so not stick to the bottom of the pan (add more stock as needed, ie: if it becomes to dry).


Then break in two eggs onto the surface of the spicy tomato mixture. Cover and cook for 3-4 minutes or until the eggs are done to your liking.


Remove the pan from the heat, sprinkle some chopped parsley on top and crumbled goats cheese. The dish is served in the pan that it is cooked in. Eat with pieces of bread dipped into the spicy tomato mixture with some egg.


(The eggs were a bit overdone, I would have liked the yolks to be more runny)


Steamed Moroccan Snapper

I cooked this steamed Moroccan snapper dish using a Neil Perry recipe from an episode of Poh’s Kitchen. The chermoula marinade was delicious and it is generally used to flavour any sort of seafood, but it can also be used for meats like lamb and chicken, and vegetables.


Ingredients
  • 4 x 200g snapper steak
  • 125ml chermoula (recipe follows)
  • Juice of 1 lemon
  • 2 tbs honey
  • Sea salt
  • 125ml water
  • 1 preserved lemon quartered, pith removed and rind finely sliced
  • 2 tbs chopped coriander leaves
Chermoula (Makes about 500ml)
  • 1 Spanish onion, roughly chopped
  • 4 cloves garlic, roughly chopped
  • 1 bunch of coriander, including stalks, washed and roughly chopped
  • 1 bunch of flat leaf (Italian) parsley, including stalks, washed and roughly chopped
  • 1 heaped tsp sea salt
  • 1 tbs cumin powder
  • 1 tbs coriander powder
  • 1 ½ tbs chilli powder
  • 1 tbs turmeric powder
  • ½ tbs sweet paprika
  • 1 ½ tbs ras el hanout (optional), a Moroccan spice mix
  • 185ml extra virgin olive oil
  • Juice of 1 lemon

To make the Chermoula
Put all the ingredients in a food processor, except the olive oil and lemon juice.
Process for one minute then slowly pour in the olive oil until a thick paste forms.
Stir through the lemon juice. If making ahead, refrigerate until ready to use.
  1. In a stainless steel bowl, mix the fish with the chermoula and leave to marinate for one hour.
  2. Transfer the fish to a shallow ceramic bowl for steaming (a large pasta bowl is often a good size for this job).
  3. Using the bowl containing any remaining chermoula, add the lemon juice, honey, some sea salt and water then mix.
  4. Pour the mixture over the fish and top with the preserved lemon rind.
  5. Place the bowl in the steamer or on the steamer tray and steam for ten to twelve minutes. A flat fillet will only take four to five minutes. The timing will vary depending on the size of the fish pieces and the depth of the bowl the fish is sitting in. Test using a cake tester or an unbent paper clip. Push this into the flesh, and test against the skin below your lip. The fish is cooked if the clip is warm on the skin.
  6. Remove the steamer from the heat.
  7. Carefully remove each portion of fish with a fish lifter and place in white bowls.
  8. Spoon the sauce left in the bowl over the fish.
  9. Sprinkle with the coriander leaves and serve immediately.

Tuesday, April 20, 2010

Tarts, The Pickup Artist and Sunday Club


I made these strawberry cream tarts for Sunday Club. The recipe was from the finale of My Kitchen Rules (http://au.lifestyle.yahoo.com/food/recipes/recipe/-/6966589/raspberry-tart-with-craeme-patissiere/). The judges raved about this raspberry tart saying that it was perfect and I wondered what made it taste so good. I checked out the recipe and found that it was all in the pastry. I have made a basic shortcrust pastry before containing butter, flour and egg yolks but this pastry contained toasted hazelnuts and coconut. All Sunday Clubbers commented on how great the pastry tasted. I couldn’t find any fresh raspberries so I used strawberries instead. Dark chocolate grated on top is a must, its bitterness is a nice contrast to the sweetness of the crème.

What is Sunday Club? 

Around three years ago, my friends and I started Sunday Club. It was a way for us to catch up each week and hang out in a relaxed, no fuss environment. We would all go over to someone’s house on a Sunday night to talk about all the things that were wrong about this world, watch TV and take turns bringing dinner.

We really got into watching So You Think You Can Dance on Sunday nights. There are a lot talent oriented reality TV shows out there but there is something about watching people who can ‘actually’ dance that is really engaging and mind blowing at times when you see the moves they can make. My favourite dances to watch are the paso doble, the tango and lyrical hip hop (when done well).

I like to have a bit of a dance sometimes but I can’t really dance…but I don’t think that it matters because the best kind of dancing is the “I don’t give a fuck” style of dancing, when you are just moving your body around in whatever way, and not caring about whether if you can dance or not, or if other people are watching. Dancing feels very liberating when you get into “that zone” … but one will always feel a little bit self-conscious when dancing so this is when a bit (or a lot) of alcohol can help.

Besides SDYTYCD, we also got into the reality TV show The Pickup Artist.


The Pickup Artist is a tale of transformation. For these eight lovable losers, "socially awkward" is the understatement of the year. And when it comes to this lonely hearts club, desperate times call for desperate measures. Enter Mystery, best-selling author and ultimate pick-up artist--a former nerd from the Great White North who has discovered the secret to wooing women. Under his expert tutelage, he'll guide this group of hapless horndogs through the rough waters of romance and help them find the courage to overcome their biggest fear--talking to women. 
In The Pickup Artist, eight misfits will live together, learn together and love together as they compete for the title of "Master Pick-Up Artist." Over the course of eight episodes, the men will learn the ins and outs of the Mystery Method-- "how to open a set," "the number close" and "the kiss close" among others. Aided by his faithful wingmen, Matador and J Dog, Mystery will teach these average guys how to turn the women of their dreams into the women of their reality. 
But this seduction school isn't confined the classroom. After each lesson, Mystery's awkward apprentices will put theory into practice, hitting bars, clubs and coffee houses in an attempt to make a love connection. Via hidden cameras, Mystery is always watching to see who's got potential and who's got to go. 
In each episode, one contestant will be declared the winner of a challenge and granted immunity from elimination, while one sad sack will be sent packing. At the end of the eight weeks, one winner will be named "Master Pickup Artist" and awarded $50,000. 

It sounds outrageous right? When I first heard that we would be watching The Pickup Artist at Sunday Club I was like this sounds really crap, I’m not watching shit like this. But this highly trashy and atrocious reality TV show is also highly addictive television watching, really interesting, hilarious and cringe worthy. What else would you want to be watching on a Sunday night?

In this superficial, hyperreality there was an element of normality that sucked us in. Watching The Pickup Artist was like watching some Discovery channel documentary on the social dynamics of the male species. We analysed each episode and had numerous discussions on the pick-up techniques used and their relevance to reality.

We also all read the The Game: Penetrating the Society of Pick-Up Artists by Neil Strauss . A book which details Strauss's infiltration into the subculture of pickup artists and reports its doings – all theories and strategies for picking-up are laid bare, including ‘The Mystery Method’. But do not be misled, it’s not all fun and games, underlying this book is a cautionary tale. Although there are lots of stories of successful pursuits, Strauss eventually reveals to you a world that dehumanises not only women but men as well, a world where many men become social robots (http://www.seductiontuition.com/neil-strauss/social-robots.html) and when Strauss meets the ‘one’, none of the tricks and on-liners worked, he had to cut out all the bullshit and just be himself.

In the end, what all these AFC (aka average frustrated chumps) lacked was some self esteem and confidence in communicating with women so some valuable lessons you can learn from The Game is how to comport oneself in public (ie: how to not freak out the opposite sex) but take everything with a pinch of salt. In the end you cannot just rely on the game, you have to develop yourself as a person – have good personal goals, live life to the fullest, treat people well, develop interests etc. Be a better person and everything else will follow.

We tried to find other shows to watch that looked at human relationships and consumed the following:
Desmond Morris The Human Sexes - a six-part documentary on the relationship between men and women (this guy looks at human relationships from a zoological point of view)
Japamorama - a series of documentaries exploring the various facets of popular culture and trends of modern-day Japan.

Below is a recipe for Sunday Club which I wrote for the zine I Am Still In Yesterday’s Clothes (Edition 3, Theme: Dinner Parties)


SUNDAY CLUB RECIPE

Serves: 4 people

Preparation Time: Sunday, approximately 7pm-11pm

Cooking Time: Rostered on, once every four weeks.

Difficulty: Moderate

Ingredients

4 friends (optional: 1 guest) 
1 delegated Sunday Club resident house
60GB of internet downloads a month
10+ illegally downloaded TV shows
1 television hooked up to Netgear (downloaded shows are streamed onto TV)
1 packet of rice crackers or rice Pringles
1 bowl of assorted nuts
2 comfy couches 
1 dinner-table with chairs (optional: eating dinner in front of the TV)

Garnish
chopped up fruit (optional: warm fruit, topped with yoghurt+nuts)
trip to petrol station down the road for ice-creams (highly recommended: Golden Gaytime)
regular intermissions with tea and coffee

Method

1. Preparation, send email to confirm attendance at Sunday Club.
2. Add requests for TV shows to be downloaded.
3. To assemble, meet up at Sunday Club resident house at 7pm.
4. Simmer with dinner.
5. Stir up with conversations.
6. Serve with downloaded television shows.

*Tips

Recommended TV Shows
- So You Think You Can Dance
- The Pick-Up Artist
- Family Ties
- 21 Jump Street
- 30 Rock
- Japanorama
- Freaks and Geeks
- Mighty Boosh
- Nathan Barley
- Snuffbox
- Garth Marenghi’s Darkplace
- Desmond Morris 
- Flight of the Conchords

Nowadays Sunday Club had expanded to 10 people, as a result we do a potluck dinner and all bring a plate of food to share. It doesn’t happen every week but maybe once or twice a month. With more people there is less TV watching and more game playing – croquet, card games, pictonary, Mafia, poker and of course more talks about life, the universe and everything.

Wednesday, April 14, 2010

Pan seared scallops with Thai style sauce, herbs and apples

My dad owns a restaurant so whenever I go over to my parents for dinner I take home a box of veges and other fresh produce. I recently acquired some scallops, when my family eats scallops we usually steam them with crushed garlic, bean threads, spring onion/coriander and a special soy sauce mixture.


One of the best scallop dishes I have had was an entrée at Nahm Thai (223 Bulwer Street, Perth) of seared scallops which from memory had fried salmon, apples, herbs and a red curry sauce. It was delicious and I loved all the different flavours in the dish.


So with my stock of scallops I decided to try searing them and make a Thai style sauce with herbs, and include apples. 


Frying Apples


Chop up a granny smith apple into thin slices (half moon shapes) and thin batons. Heat some ghee (clarified butter) in a frying pan and fry the apples slices over medium heat until they have browned on both sides. Remove apple slices from the pan and place on a paper towel. Lightly fry the apple batons till had softened but not browned. 


Searing Scallops


Note: scallops must be very dry and the pan has to be very hot in order to get a good sear


Rinse the scallops and place them in a single layer on paper towels and cover with another layer of paper towels, press lightly on the scallops to remove any moisture. Remove the scallops from the paper towels and season with some salt and pepper. 


Heat a frying pan over med-high heat, add in some oil and swirl around. Gently place the scallops in the pan and allow the scallops to cook undisturbed for at least 2 minutes until seared/well browned on one side (larger scallops may take 3-4 minutes per side) and then turn over and sear the other side. Scallops are done when both sides have a crispy looking caramel coloured crust, and the flesh has lost its translucency and turned opaque. Remove the cooked scallops from the pan and place on paper towels. 


The seared scallops tasted amazing, I could have devoured them all as they were, no other seasonings were necessary. Scallops do not really need much to make them taste great (you can actually eat them raw), you just have to make sure that you cook them right and get them nicely tender and juicy,  scallops will toughen and become dry with overcooking. 


Thai Style Sauce with Herbs


To make a thai style sauce for the scallops, heat some oil in a saucepan and lightly fry some crushed garlic, minced fresh red chillies, finely diced coriander stalk, fish sauce and coconut milk. Stir together and then add in some white sugar and palm sugar, and thinly sliced kaffir lime leaves. Cook the sauce for only 1-2 minutes, just long enough to bring out the flavour of the garlic/chillies but don’t cook for too long or it will loose its fresh flavour and nutrients. Remove the saucepan from heat and add in a little lime juice. Taste and adjust with more sugar and fish sauce to achieve desired taste. Stir in some sweet basil leaves and coriander leaves. 


Below is a very rough guide for the ingredients in the sauce, I relied on my taste to achieve a balance of hot, sweet and sour so adjust the quantities as necessary.
  • 2 tablespoons peanut oil
  • 1 tablespoon fish sauce
  • 1-2 red bird’s eye chillies, minced
  • 2 garlic cloves, minced
  • 2 teaspoons of finely diced coriander stalk
  • 2 tablespoons coconut milk
  • 1 teaspoon white sugar
  • 2 teaspoons palm sugar
  • 2 thinly sliced kaffir lime leaves
  • 1-2 tablespoons freshly squeezed lime juice
  • some sweet basil leaves and coriander leaves


To Serve


Place the scallops on top of the apple slices, spoon the thai sauce/herbs over the scallops and place some apple batons on top. 


The acidity and tangy-sweet flavour of granny smith apples goes really well with the natural sweetness of the scallops.


Tuesday, April 6, 2010

Prawns sautéed in fresh coconut milk


With the fresh coconut milk I had made previously, I used it to make a simple and tasty Vietnamese dish involving prawns.

You can use any kind of prawns but I used small prawns, the meat is much more tender and as it is small, it absorbs the flavours of the sauce more. 


Shell and devein the prawns.

Heat up a frying pan and add in a little peanut oil. Fry some finely diced shallots till they have softened a little, then add in some crushed garlic and finely sliced chillies, and fry till fragrant (when you can smell the aromas of the garlic and chillies coming through).

Add the prawns into the pan and fry until they start to turn pink, then add in some coconut milk (don't need much, start with 1/2 cup) to cover the prawns. Season with some salt, pepper, fish sauce and sugar to taste. Simmer all together for a few minutes and then serve garnished with coriander.


David Thompson - Thai Dressing and Salad

I have David Thompson’s Thai Food and I highly recommend it everyone because it is a fantastic cookbook.


David Thompson is an Austrailan chef who has spent years in Thailand learning the culinary of Thai cuisine, he does everything in a traditional and authentic manner (he hates fusion food with a passion!), roaming the streets and countryside, collecting knowledge and recipes from old women - recipes which are not written but passed down from generation to generation. Thompson also collects Thai memorial books, which are published when a person dies and include a wide selection of the deceased's favourite dishes. They offer one of the few written sources of classic recipes. The archive that Thompson has collected includes books dating back to the 19th century. His restaurant Nahm in London was the first Thai restaurant to ever gain a Michelin star and he has even been asked by the Thai government to set up restaurant in Bangkok to serve the very best thai cuisine. So the King of Thai food is an Aussie!


Thai Food provides the most comprehensive account of Thai cooking that you will every find published in English.  There are over 300 recipes that are very thorough and authentic. What I really appreciate about this book is that is provides a wealth of information which helps you to put everything about Thai cuisine into context including chapters on the role of food in Thai culture, a guide on ingredients used, the essentials of Thai cookery and sample menus which give you ideas for combining Thai dishes. Each recipe has an intro with a bit of background, a discussion of the main ingredients used (including possible alternatives for the hard to find ingredients) and also a description of what it should taste like. Everything is about taste, being able to describe what you taste is important, once you know what you are tasting, you are able to correct, to adjust flavours and to reach a balance.  This cookbook is not just about showing you how to cook thai food, its about teaching you how to cook thai food. 


At the start of the chapter on salads, there is a thai salad dressing exercise which teaches you the dynamics of seasoning. The resulting salad dressing is amazing, full of flavour and has a great balance of hot, salty and sour.


Ingredients
2 coriander roots, scraped
2 pinches of salt
5 garlic cloves, peeled
6 bird’s eye chillies (scuds)
3 tablespoons white sugar
9 tablespoons lime juice
2 tablespoons palm sugar
4 tablespoons fish sauce


Using a pestle and mortar, pound 1 coriander root with a large pinch of salt and 3 garlic cloves. Pound 3 chillies into the paste and sniff: it should be rich with garlic, clean from the coriander root and sharp with chillies, but with no one fragrance overwhelming the others. 


Add and puree another 2 cloves of garlic. Notice the subtle change. To adjust the balance, puree another coriander root, a pinch of salt and another 3 scuds. The dressing will be more pungent now, but the balance should be restored.


Now add 2 tablespoons of white sugar and the use the pestle to grind the granules. Add 2 tablespoons of lime juice and stir with the pestle until the sugar has completely dissolved. Taste the dressing. The sugar dominates, masking the garlic and coriander and even the chillies (momentarily). The chilli then shines through. Add a tablespoon of palm sugar and notice the mellowness that this sugar imparts, covering the heat once more. Add an extra 4 tablespoons of lime juice, not the dressing should be pleasingly tart. All the ingredients can begin to be tasted as the sweetness recedes.


Add a further tablespoon of lime juice, and the dressing becomes sharp and clean and all the tastes are clear. Add another. Pour in 3 tablespoons of fish sauce, a tablespoon at a time, tasting after each addition. The dressing becomes more defined – tighter, as it were. Surprisingly, it even becomes sweeter. The dressing should be balanced: sour, salty, hot and sweet.


To continue the exercise, add a further tablespoon of fish sauce and see how the dressing becomes surprisingly salty. This can be adjusted by adding roughly 2 tablespoons of sugar, one white and the other palm – each will result in a slightly different finish – add 1 more tablespoon of lime juice. The balance should be regained.


The end of David Thompson’s thai salad dressing exercise! The aim of the exercise was to show you how each component in the dressing should be appreciated and how they can be manipulated to strike a balance. 


In addition to this exercise, Thompson provides the following information on the different elements of flavour for seasoning salads:
  • Sweetness gives the dressing body and depth; however, it should never be the dominant seasoning. 
  • Saltiness makes flavours more discernable, drawing out especially – yet surprisingly – the sweetness of other ingredients.
  • Sourness cleans, highlighting the other tastes and ingredients. 
  • Heat gives pungency to the dressing, but also helps to clean the other seasonings and flavours, preventing them becoming a clutter of tastes. It also makes the palate more sensitive to texture.
Thai Food has a number salad recipes which I skimmed through and then came up with my own thai salad, drawing elements from different recipes. I wanted my thai salad to have a depth and complexity of flavour, and lots of different tastes and textures that balanced well together. 


I started off by putting a layer of thinly sliced cucumber on a plate (I used a peeler to achieve a ribbon effect). 


Then I put pieces of red grapefruit on top. 


In a bowl I mixed together some prawns (which I had poached), bean sprouts, finely sliced shallots, some mint, coriander and thai basil leaves. Then I added in a few tablespoons of the thai salad dressing I had made from going through the salad dressing exercise and tossed everything together to combine.


Then I piled the prawn mixture on top of the grapefruit, adding a little more salad dressing on top and then sprinkled on some fresh grated coconut.


(Top View)


(With freshly grated coconut on top)


In assembling this salad, I put some thought into the presentation and how it might contribute to the taste of the dish, drawing from my experiences at the Amuse masterclass. Everything was deliberately piled up high, on top of each other. 


You delve into the salad from the top, digging into the prawns and veges (with crunchy textures provided by the bean sprouts and bursts of flavours from the herbs) with a pungent and flavoursome salad dressing, countered by the rich and cooling freshly grated coconut. Then you hit into bittersweetness with the grapefruit (which is acidic and provides a little relief from the heat of the chillies in the salad dressing). Lastly, you get a pleasing and crisp coolness from the cucumber at the bottom of the salad.


The salad tasted awesome, it was everything that I wanted it to be, and I also have to say that prawns and grapefruit so really well together.


As David Thompson would say:
“the ideal of a Thai salad is simplicity, but it is also about a balancing of ingredients”.

Making fresh coconut milk

Over the long Easter weekend, I added another skill to my cooking repertoire – making fresh coconut cream and milk. 


You can readily buy cans of coconut cream and milk from the supermarket but the taste of fresh coconut cream and milk is far superior, it has a lovely aroma and a delicacy of flavour that justifies the time and effort required to produce it. 


You definitely notice the difference when you use fresh coconut milk in your dishes.


To make coconut cream and milk, you need a coconut. 


There are a few things to take into account when selecting a coconut to ensure that you get the best one. 

  • You should choose a coconut that feels heavy for its size as this indicates that there is a good amount of flesh inside the coconut. 
  • When you shake the coconut, you should hear a pronounced sloshing sound from the coconut water inside, this indicates that it’s fresh. A dry coconut is old or damaged. Out of all the coconuts at the store, try to find the one that seems to have more water inside than the rest.
  • Check the eyes of the coconut, they should not have any mould around them (this is a sign that there may be mould growing inside the coconut) and they should also be quite firm.
  • Make sure there are no cracks on the shell, it should be intact protecting the meat inside.
  • Coconuts should be stored in a cool place or in the refrigerator.

So you should basically be standing in front of the coconut stack at the store, picking up each coconut and feeling its heaviness, and then shaking it about, listening for water inside.   


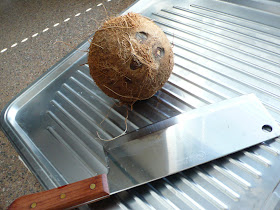
I picked a happy looking coconut.


Hold the coconut in the palm of one hand and in the other hand, you need to use the back of big heavy cleaver to crack down on the coconut around the centre, rotate the coconut around as you whack it with the cleaver (warning: as the coconut shell starts to split, it will spit out coconut water at you, so it is best to do it over the sink).


You should end up with two bowl shaped pieces, wash the insides of the coconut halves with water. Then you need to get the flesh out. I didn’t have the proper tools (ie: a coconut grater), so I used a zester…this took a long time (it’s like digging a hole in the ground with a spoon instead of a shovel). I looked around for something else to get the flesh out and found a melon scoop. This was slightly better, as I was able to get more flesh out in a shorter amount of time.


Once you have removed all the flesh from the coconut, put the flesh into a food processer/blender with around one cup of warm water and pulse a few times. This extracts the oils and the aromatic compounds.


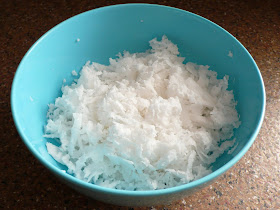
Then extract as much of the coconut cream and milk as possible by squeezing through a muslin into a glass bowl and leave to separate for at least 20 minutes. You will also be left with desiccated coconut which you can save and use for baking.


As you can see in the picture below, the cream is the thicker opaque liquid that separates and floats on top of the thinner liquid, which is the coconut milk.


Note: It is best to use the coconut cream and milk within a few hours. They can be kept refrigerated but the cream can sour within a day or two. To arrest this process, the coconut cream and milk can be simmered for a minute, this is, in effect, pasteurization.